Monday, 2 December 2013


What is Selenium IDE?

Selenium IDE is simple, easy to learn & portable record and play tool for web applications. Learning curve for Selenium IDE is less & no need to learn test scripting language. It is open-source tool & available for download for free. Selenium IDE means Integrated Development Environment (IDE) used for selenium tests. It is come in terms of Firefox extension & used for recording, editing & playback scripts.

Features of Selenium IDE:

  • Simple & easy record and playback
  • Supports intellectual field selection options like ID’s, XPath, and Names.
  • Support for Selenium user-extensions.js file
  • Clever option for adding different assert options in scripts
  • Save test scripts in several formats like Selenese, Ruby and many more formats.
  • Supports Walkthrough tests
  • Allow to customization through plug-ins easily
  • Allow to set breakpoints & debug the scripts.
  • Supports Auto-complete commands

Installation of Selenium IDE:

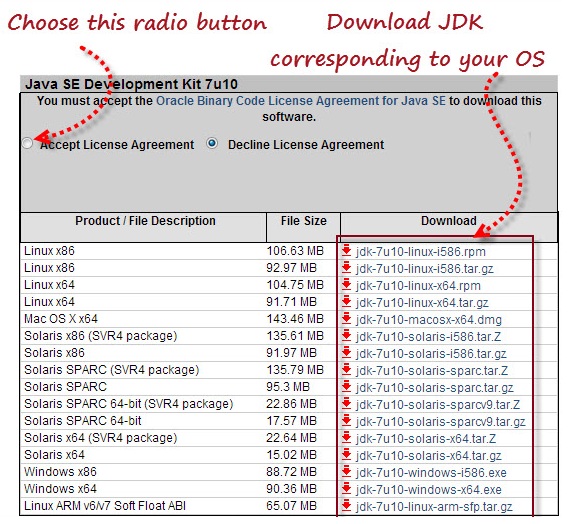
To learn Selenium-IDE, first you have to download Firefox & Selenium IDE extension on Firefox. Here are the simple steps to be followed to install Selenium IDE: 1) Download Firefox browser (if required) 2) Get Selenium IDE here.
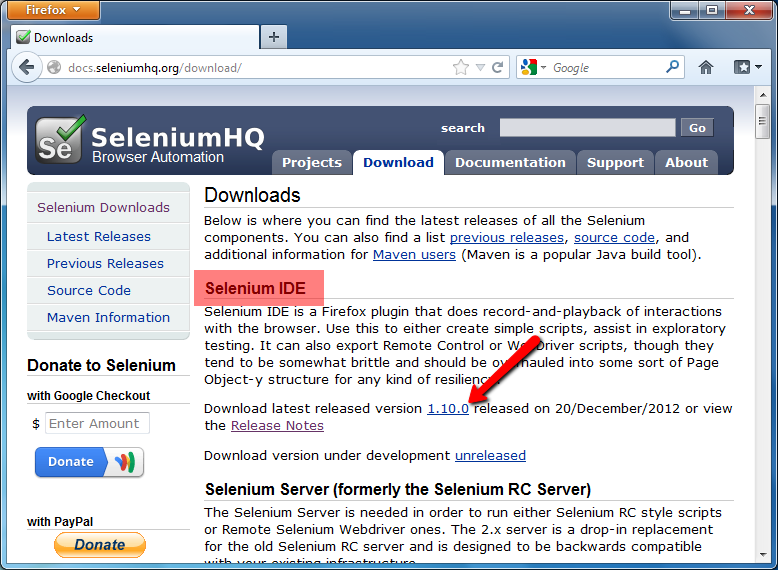
Download Selenium IDE for Installation
3) Install Selenium IDE plugin on Firefox browser 4) Restart Firefox. 5) Navigate to Tools menus & click on newly added Selenium IDE (Ctrl + Alt + S) option.
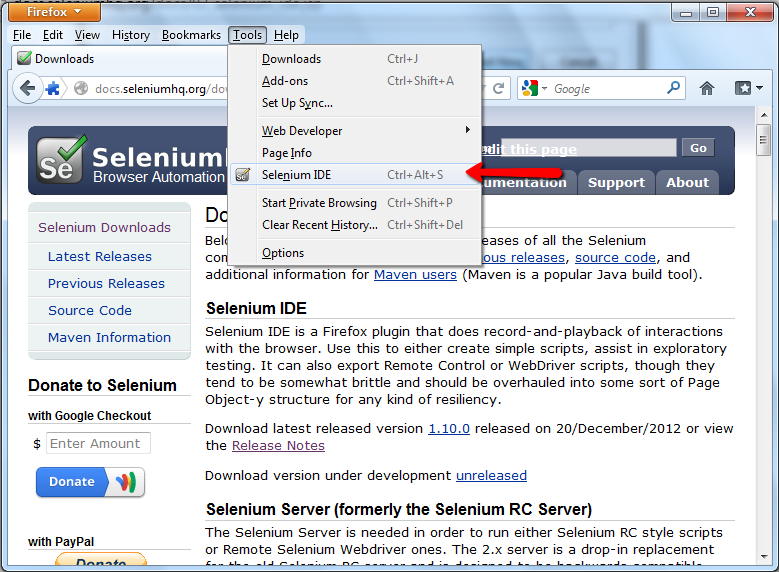
Launch Selenium IDE
Launch Selenium IDE
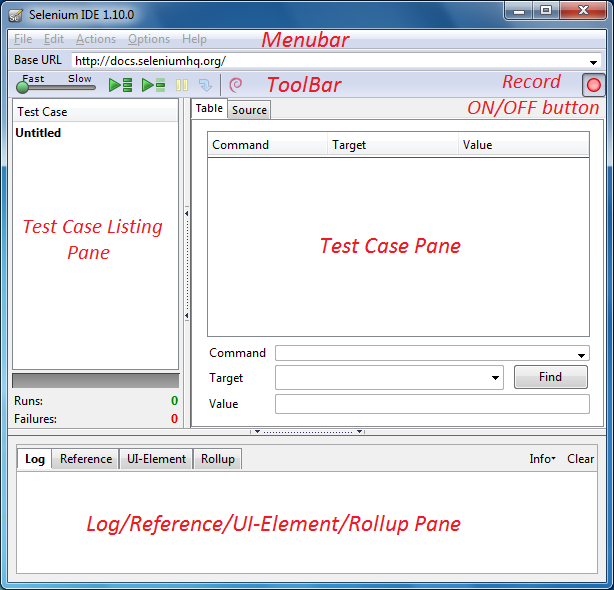
Now you  are ready to learn Selenium IDE!! Base URL: The Base URL field at the top of the Selenium-IDE window is very useful for allowing test cases to be run across different domains. Tool Bar: It supports different options like: Speed Control, Run All, Run, Pause/Resume, Step, TestRunner Mode, Apply Rollup Rules Test Case Listing Pane: Selenium IDE is open in new window. In the left side of the window shows the test case pan & all test cases will be listed in the section (default entry United). Multiple test cases can be added in this section & upon executing test cases all test cases are executed sequentially. Record Button: On the right side of the window you will see Record ON/OFF button, using this you can record start and stop the script recording. Test Case Pane: It’s test script editing window where your script is displayed in this section. It has two tabs, one for displaying the command and their parameters in a readable “table” format. The “Command” column displays the commands that takes the the action & values in this columns are very straight-forward like: open, click, select etc. The “Target” column displays the what you are trying to interaction with command. It can be represented a variety of ways:
  • URLs – “/dashboard.action” – represents a url. The first part of the URL is the Base URL up at the top, and this URL is relative to that.
  • Text – “link=Recording a Test” – the text of the link
  • XPath – “//input[@value='Search']” – XPath is an XML-like language that can be used to specify the location of an element in a document
  • Label – “label-Selenium IDE” – selects the item with the visible label of Selenium IDE.
  • HTML id – “spacelink-SIDE” – this is the HTML id of the link
  • HTML name = “searchQuery.queryString”
The “Value” column used to pass if any data pass to command. If you explore more on above three options then The best way to understand these values is to click on the command you are trying to use, and look at the bottom, on the Reference tab. It will give you information on how the command works, and what all the arguments are.Log Pane: At the bottom of the window you will see the Log panel where you can get the log generated once the test case is executed. It allows you to resize the all pans. Selenium IDE window is look like as:
Getting Started With Selenium IDE

Recording the first test case using Selenium IDE:

In the section we are seeing how to record the test case & re-run the test cases:
  • Launch Firefox browser
  • Enter URL https://www.google.com
  • Navigate to Firefox menu Tools > select Selenium IDE option
  • Confirm the Record button present in the right side of the toolbar is switched ON.
  • In Google website enter search for “Software Testing Class”
  • Click on Record button again to stop recording.
  • Click on Run button to playback recorded test.
  • The result will display something like this:
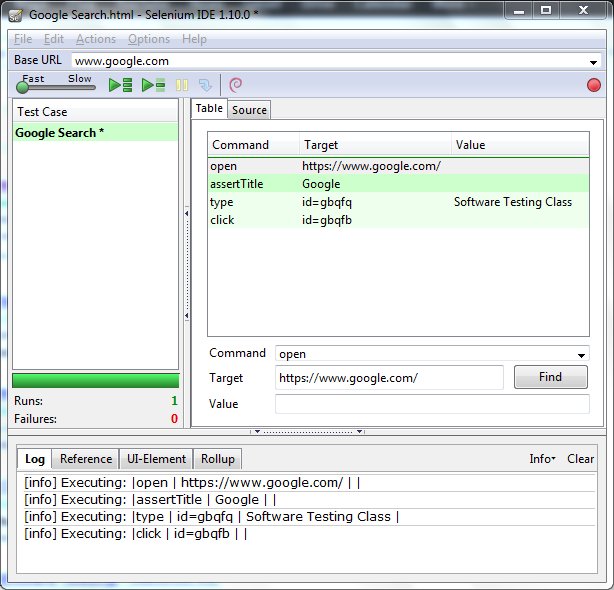
The first test case in Selenium IDE
Selenium Tutorial :  My Trail to learn the best available web automation tool

                 Today , i faced a serious problem, my work got diversified into web application development. i had to find some way to automate my unit cases . after extensive research found that selenium webdriver is the best tool available there. i will discuss about its advantages and differences with the other tools in the later posts. first lets start with the installation of the selenium web driver.

How to run your first Selenium WebDriver script - Selenium WebDriver Tutorial

In previous article we have seen about What is Selenium Webdriver?In this article we are concentrating on implementation of the WebDriver, we will see how to selenium webdriver download and configure the Selenium Webdriver with Eclipse & run your first selenium web driver script.
Selenium WebDriver installation is divided in to simple steps to get & learn how to Install & configure WebDriver to kick of your automation testing. Also we will run your first automation script using WebDriver.

Step 1) Download & Install Java on your Computer

Before start working with the Learn Selenium WebDriver, we will need the first download Java Development Kit (JDK).
Here you can download Java Development Kit (JDK).
Download Java Development Kit (JDK)
Step 2) Install Eclipse on your computer
Eclipse is open source software development environment written in Java. It supports supports multiple languages. In this tutorial we will using Eclipse to write the code in Java & execute your first test script.
Here you can download “Eclipse IDE for Java Developers
Make sure that you are downloading correct version of Eclipse based on the Windows 32 or 64 bit version.
Download “Eclipse IDE" for Java Developers
Download “Eclipse IDE” for Java Developers
Once you select the windows version based on your requirement, you should be able to download a “eclipse-java-juno-SR2-win32-x86_64.zip” ZIP file.
Once you successfully download the ZIP file, extract the ZIP file in your PC.
For Eclipse, you do not need any installation; just double click on “eclipse.exe” file in the extracted ZIP folder.

Step 3) Download Selenium Java Client Driver

Selenium client driver is available in the different languages like Java, C#, Ruby, Python etc. But in this article we are concentrating on Java language.
Here you can download “Selenium Java Client Driver
Download “Selenium Java Client Driver”
Once you click on Download link for Java client then you should be able to download a “selenium-java-2.31.0.zip” ZIP file.
Once you successfully download the ZIP file, extract the ZIP file in your PC in the directory “C:\selenium- java-2.31.0”. You will see JARs files in extracted folder which would be imported in to Eclipse before running our first Selenium WebDriver script.

Step 4) Configure Eclipse with Selenium WebDriver

In Step 2 we have installed Eclipse, just Launch the “eclipse.exe” file from the extracted Eclipse folder.
Once you open the “eclipse.exe” file then it will ask you to select the workspace, here you can select the path where you want to save Eclipse project.
Selenium WebDriver workspace in eclipse
First step is to create a Java Project:
  • Go to File menu > New > Java Project.
  • Enter Project Name as “Selenium_webdriver_project”
  • Click on Finish button.
Create Java Project - Selenium WebDriver
Create Java Project – Selenium WebDriver
Second step is to create a Class under Java project:
  • Under newly created project “Selenium_webdriver_project” you will see the “src“ folder & right click on the “src” folder & create the new class as “Webdriver_class”.
Create Java Class - Selenium WebDriver
Create Java Class – Selenium WebDriver
Once you created the class you will see the Eclipse screen like this.
Start with Eclipse
Start with Eclipse
  • Right click on “Selenium_webdriver_project” & select Properties option.
  • Select “Java Build Path” option in the left side of the Properties dialog box.
  • Click on Libraries tab
  • Click on “Add External JARs..” button.
  • Select the extracted Selenium Java Client Driver folder downloaded in Step3 & add all JAR files present in the inside & outside of the “libs” folder. Once you select these JAR files then your properties folder will look like as below.
Import External- Selenium Client JAR Files
  • Click on OK in the Properties dialog box to import.

Step 5) Run your first Selenium WebDriver script.

Once you complete the Step 1 to Step 4 then you are ready to execute your first WebDriver script. You can just copy paste the code written below & click on Run button to execute your first script. Code below which is written to opens the new Firefox browser window & open the Google page in it. It also read the Title of the page & close the browser window.
01//Run yout First Selenium WebDriver script by copy paste below code after executing above five simple steps.
02 
03import org.openqa.selenium.WebDriver;
04import org.openqa.selenium.firefox.FirefoxDriver;
05 
06public class Webdriver_class
07{
08   public static void main(String[] args)
09   {
10       WebDriver driver = new FirefoxDriver();
11       driver.get("http://google.com");
12       System.out.println(driver.getTitle());
13       driver.close();
14   }
15}
Conclusion:
In the next module we will see some more Selenium Webdriver tutorials & its features. Working with the WebDriver is really interesting, you will love these modules as it has got so many information on WebDriver & Selenium which help you a lot while doing the interviews & while doing automation testing using. Stay tuned for more updates